

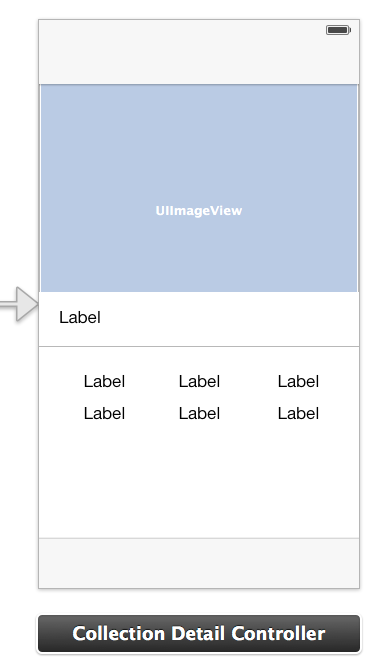
how to design ios app ui
Tutorial – How To Design An iOS 7 App
Introduction
iOS, the most popular operating system for mobile devices, has grown up and made it in version 7, while great new features and important improvements acclaim it as the most advanced mobile OS once again. From the totally redesigned user interface, until the last minor improvement, iOS 7 makes developers able to create applications more evolved and more sophisticated than ever. On the other hand, single, end users enjoy new, richer experience too, as, beyond the brand new UI, they are now more focused on their content and they access features quicker and easier.
This tutorial aims to approach the iOS 7 designing principles and give you a nice taste of it. A quick theoretical presentation is important so as some new design guidelines to be highlighted, but the most interesting part will come by upgrading visually a totally un-styled sample application. So, get on board and keep reading to explore some new great features!
The Sample Application and Our Mission
In order to follow the next steps of the tutorial and get the most out of it, we will use a pre-made, starter sample application, which you are advised to download now. In this section I'm going to present it and discuss a little about it, so if you want run and test it, but make sure to stick here and see what's all about it.
This sample is just a demo of a mobile application regarding a store, which sells clothing, shoes and accessories products. It incorporates view controllers for displaying product data, product details, contact info and a map view with locations representing where products can be found. The next figure shows the initial screen of the app once it gets run:
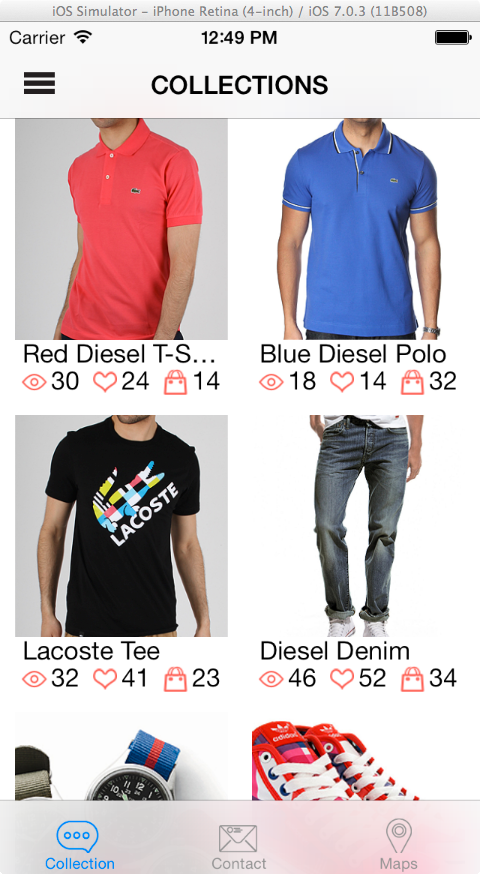
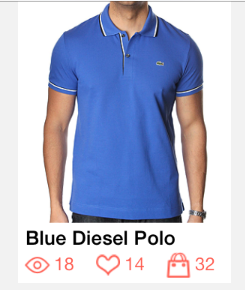
As you see, the interface is totally un-styled and unpolished. No design at all has been applied, and all subviews have just been positioned to the appropriate places, maintaining their initial properties. If you would see an app with such an interface on the App Store, it's certain that you would never have it downloaded. Before going deeper regarding all the interface negatives and how everything could become much better, it would be a good idea to do at this point a little more detailed reference on the app's contents. So, first of all it's obvious that this is a tabbed application, with three tabs in total. The controller of the first tab with the Collection title, is a navigation controller, which in turn contains a collection view (UICollectionView). In the collection view they have been populated all of the (demo) products along with some of their details. The previous figure shows the contents of the first tab.
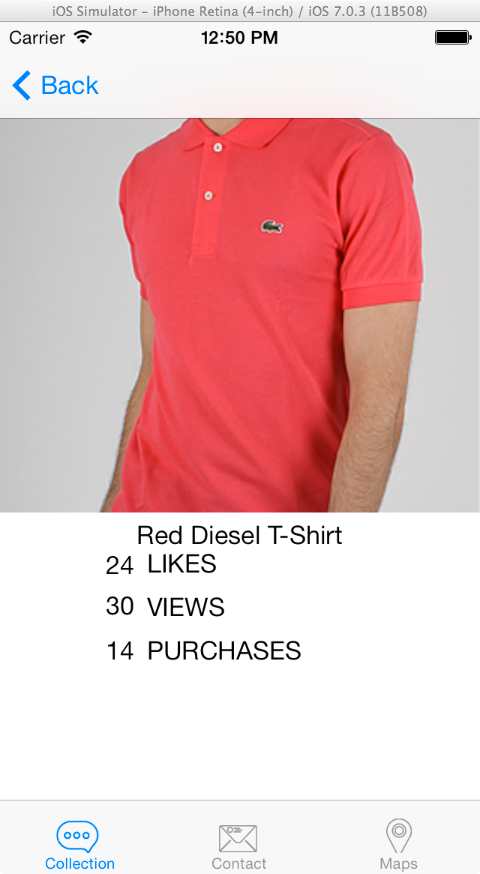
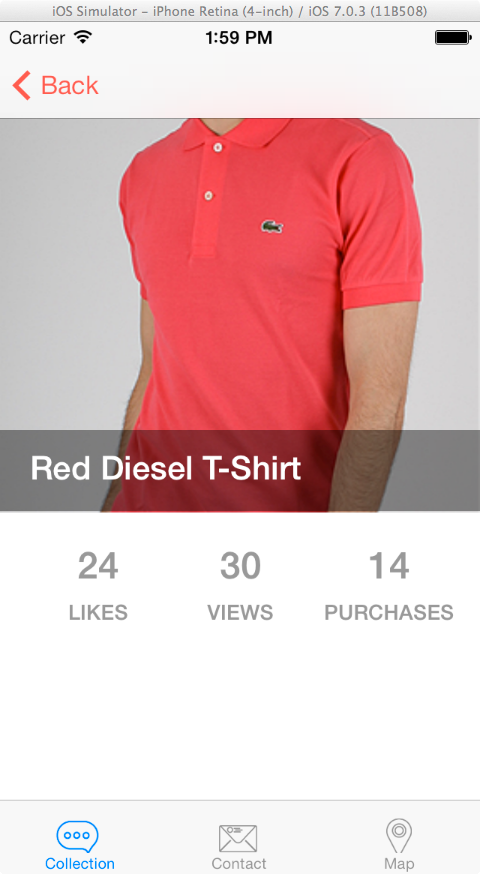
Each product has detailed info, which is displayed on a secondary view controller that appears once a product gets tapped. The navigation controller is responsible for performing the back and forth transitions. Here is a sample of the product details view controller:
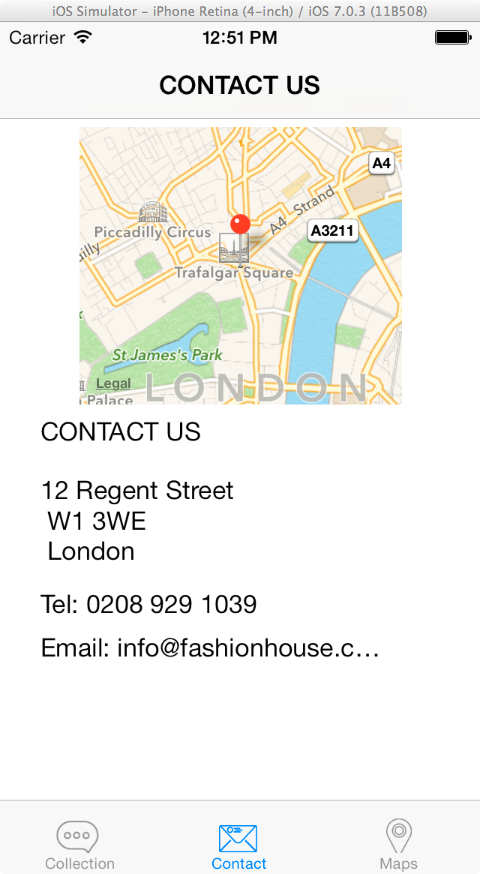
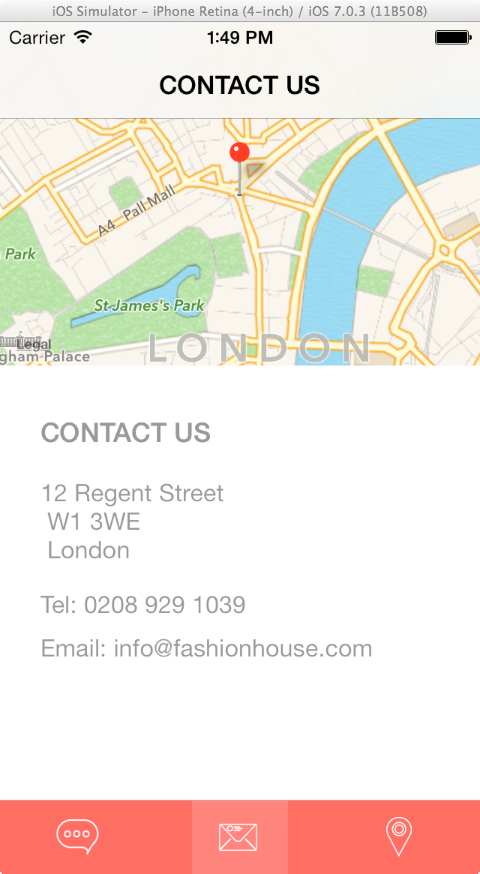
The app also contains a Contact tab. Behind this tab exists a map of the hypothetic store and some contact information. Here it is:
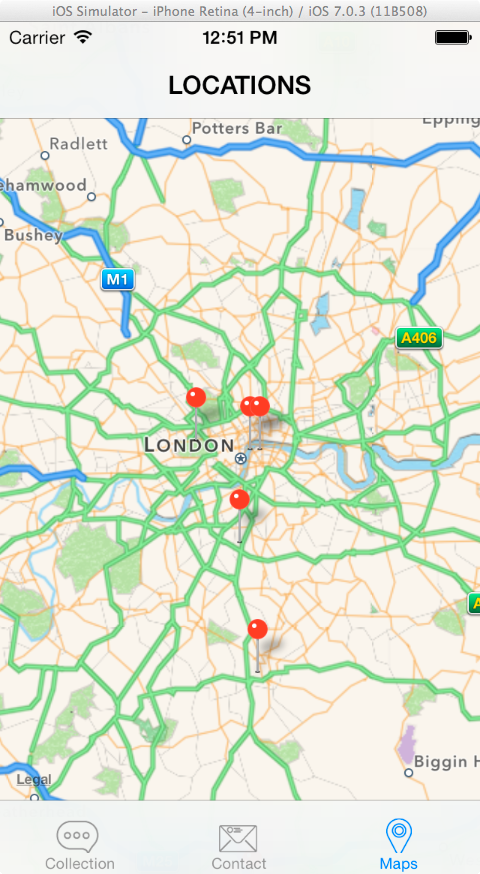
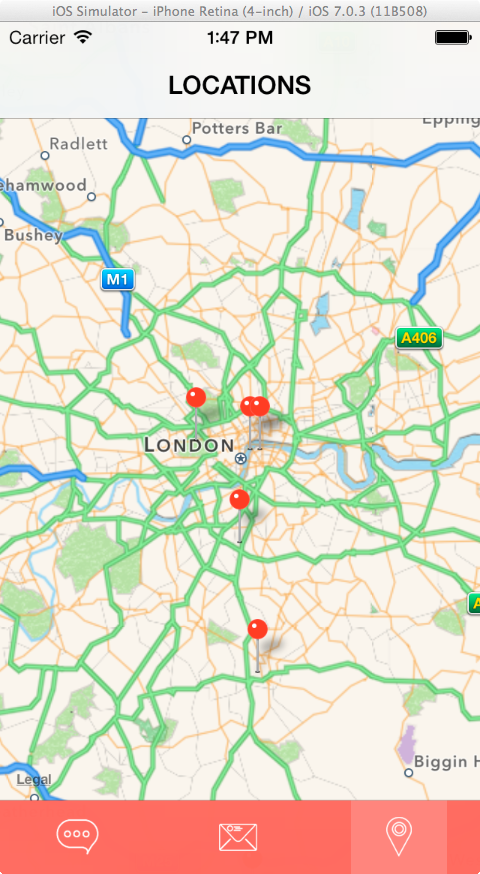
Finally, there is the Maps tab, which displays just a map with pins of stores that sell the demo products:
Our goal is to fix every bad-looking visual element, so as to transform the application to a great-looking, attractive and eye-catching one. The way we are going to move from here on is to visit every view controller separately, and for each subview that needs improvements we'll firstly make a small discussion about what's wrong and then we'll add code that applies some design. Everything will be presented step by step, so every action we take will be clear. What you need to do, is to open the starter project and keep up with the steps described next.
Before we begin, you may go and run the starter project if you haven't done so already. Navigate your self through all those four view controllers and get to know its functionality. Then get back here to discuss how the interface can be fixed.
The Collections View Controller
Step 1
Let's begin working with the product collections view controller and let's focus on the navigation bar for a while. Currently, it contains a bar button item at the left side of it and the title. One more item could be added at the right side, showing the total number of products one has shopped using the app using a badge icon. Actually, that would be great from programming view as well, as Apple doesn't provide a built-in option for adding bar button items with badges on the navigation bar (even though this is done in the tab bar), so it would be interesting to see how this can be manually done. The navigation bar is shown right next before and after adding an extra bar button item with a badge on it:
![]()
![]()
Programmatically speaking now, go to the Xcode project and open the CollectionsViewController.m file. Head to the implementation of the setupNavigationBarItems method, and look at how the left bar button item is created in code. As you see, it's pretty straighforward to way the button is created and how an image is used to represent it on the navigation bar. However, for the right bar button item we want to add, things are not that simple. The problem lies in the fact that we cannot use a simple image just like we did for the left button, because we want a badge to be displayed at the top-right, and its content must be able to be changed dynamically.
To better understand what's possible to be done and what's not, it's necessary to say that the badge is going to be a UILabel object actually, which, and that's the most important, needs to be added as a subview to the right bar button item. However, a plain UIBarButtonItem object doesn't allow any subviews to be added to it, so we cannot use such an object in this case. To counter this, we'll use a UIButton object, which firstly will be added as a custom view to the right bar button item (not as a subview), and secondarily, the badge label will be added as a subview to it.
The icon that will be used for the button is the next one and it's named collections_right.

So, first of all, let's create the UIButton button. Let's see the code first and then we'll discuss it.
- ( void )setupNavigationBarItems{ ... ... ... // Get the image. UIImage *collectionsRightImage = [UIImage imageNamed: @ "collections_right" ]; // Create a custom UIButton with size equal to the image's size. UIButton *rightButton = [UIButton buttonWithType:UIButtonTypeCustom]; [rightButton setFrame:CGRectMake( 0.0, 0.0, collectionsRightImage.size.width, collectionsRightImage.size.height) ]; // Set the image to its image property. [rightButton setImage:collectionsRightImage forState:UIControlStateNormal]; }
Initially, we get the image as a UIImage object. After that, we create a custom UIButton, named rightButton. It's quite important to make its size equal to the image's size, and that's what is being done next. Finally, we set the image that appears in the normal state of the button. Note that we set no title for it, just the image. Even though the button is now ready, if you run the app you won't see it appearing on the navigation bar. That's because we haven't added it yet to the navigation bar. This is going to be done in a while.
According to the image of the outcome, the badge label must be rounded, and that can be achieved by utilizing the setCornerRadius method of the layer label's property. In order to access the layer, it requires the QuartzCore framework, which is already imported to the project. Let's write the code that creates the badge label first, and then we'll say a few things about it, even though there are comments describing each line.
- ( void )setupNavigationBarItems{ ... ... ... // Create a custom UILabel object with the following frame, so as to make it appear at the upper-right side of // the custom UIButton. UILabel *badge = [ [UILabel alloc] initWithFrame:CGRectMake(rightButton.frame.size.width - 6.0, rightButton.frame.origin.y - 4.0, 15.0, 15.0 ) ]; // Set the background color. [badge setBackgroundColor: [UIColor colorWithRed: 1.0 green: 91.0 / 255.0 blue: 84.0 / 255.0 alpha: 1.0 ] ]; // Set the corner radius value to make the label appear rounded. [ [badge layer] setCornerRadius: 8.0 ]; // Set its value, alignment, color and font. [badge setText: @ "5" ]; [badge setTextAlignment:NSTextAlignmentCenter]; [badge setTextColor: [UIColor whiteColor] ]; [badge setFont: [UIFont fontWithName: @ "Helvetica-Bold" size: 12.0 ] ]; // Add the image as a subview to the custom button. [rightButton addSubview:badge]; }
Let's see the code line by line. At first, we allocate a UILabel object named badge, using the initWithFrame: method in order to set the frame we want. It's obvious that the calculations been made regarding the X and Y origin points of the label define its position. After that, we set its background color. These color values compose the color shown in the sample image. The next line is the one that the QuartzCore framework has been linked for. Through the layer property of the label, we set the corner radius to 8.0 points to achieve the round shape. You can change it if you want, but I guess it's the best value that gives us an almost perfect circle. All lines that follow are quite simple, as they set the label's text, alignment, color and font values. Finally, the label is added as a subview to the button. Not really hard after all, right?
One thing has been left to be done, and that is to add our custom button to the navigation bar. That's simple:
- ( void )setupNavigationBarItems{ ... ... ... UIBarButtonItem *rightBarButtonItem = [ [UIBarButtonItem alloc] initWithCustomView:rightButton]; self.navigationItem.rightBarButtonItem = rightBarButtonItem; }
Notice that in this case we use the initWithCustomView: to initialize the bar button item and to provide our custom button. If you run the app now you will see that the navigation bar is ready, even though the bar button items trigger no action. So, a part of the app has been prepared and we are ready to move forward to the next one.
Step 2
Let's focus now on the collection view and the way the data existing on its cells is displayed. It is apparent that visual improvements are urgently needed, but let's do everything in order.
First of all, we can avoid the white tediousness simply by altering a bit the background color of the collection view, and making it more grayish. That's quite easy to accomplish. In the CollectionsViewController.m file go in the viewDidLoad method, and locate this line:
_cvCollections.backgroundColor = [UIColor whiteColor];
Then, change it to this one:
_cvCollections.backgroundColor = [UIColor colorWithWhite:0.95f alpha:1.0f];
If you give the app a try, then you'll see the difference.
Let's deal with the collection view cells now. Each product brand title needs to be fixed, in order to properly fit on the cell and clearly display its content. Further than that, the views, likes and purchases stat values are pretty big and not in accordance to the respective icons. Therefore, we need to decrease the font size for both the brand title and the stat values, and to make it even better we could change the stats' text color, so it perfectly matches to the icons. All these modifications will take place on the CollectionsCell.m file, as the collection view cells have been subclassed in order to be easily customized. Once you open this file, navigate yourself in the awakeFromNib method, and add the next code fragment in it:
- ( void )awakeFromNib{ ... ... [_lblBrand setFont: [UIFont boldSystemFontOfSize: 13 ] ]; UIFont* smallFont = [UIFont systemFontOfSize: 12 ]; [_lblLikes setFont:smallFont]; [_lblPurchases setFont:smallFont]; [_lblViews setFont:smallFont]; [_lblLikes setTextColor: [UIColor colorWithRed: 1.0 green: 91.0 / 255.0 blue: 84.0 / 255.0 alpha: 1.0 ] ]; [_lblViews setTextColor: [UIColor colorWithRed: 1.0 green: 91.0 / 255.0 blue: 84.0 / 255.0 alpha: 1.0 ] ]; [_lblPurchases setTextColor: [UIColor colorWithRed: 1.0 green: 91.0 / 255.0 blue: 84.0 / 255.0 alpha: 1.0 ] ]; self.contentView.backgroundColor = [UIColor whiteColor]; }
Firstly, the brand label title gets changed to a smaller font size. Doing so we manage to avoid the clipping that occurs when the brand name is too large. Next, we specify a smaller font size for all stat values as well, and we assign it to them. Finally, we set the appropriate text color to all stat labels, so as they fit to their respective icons. Besides that, the cell's content view background color is set to white, so it gets emphasized even more over the gray collection view background.
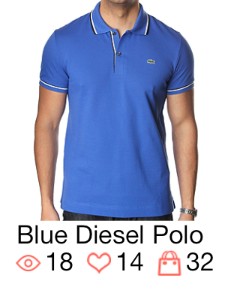
Here is a sample after our changes:
The Collection Detail View Controller
If you have tested the sample application, then you know that when tapping on a product in the collections view controller, a new one containing just the selected product shows on-screen. Even though the displayed information is clear enough, looking at it from the design aspect becomes obvious the imperative need to visually upgrade it.
There are various changes that can be done here. One cool modification would be to place the brand title above the image, and in order to make it an eye-catching label we could add a semi-transparent background view behind it. Also the title's text size can be increased and its color turn to white. Regarding the stat titles and values, we could re-arrange them in way similar to an Instagram profile page and even more, to slightly change their color to a more grayish one.
Here is a sample of the outcome after applying our changes:
Step 1
Let's begin by adding the brand title's background view, as shown at the image above. lick on the Main.storyboard file to let it appear on Interface Builder. Next, go and locate the Collection Detail Controller scene:

From the Object Library in the Utilities Pane, drag and drop a UIView object in front of the existing image view on the scene. Perform the next two actions on the view object:
- Set its frame. On the Size Inspector of the Utilities Pane, set the next values: X=0, Y=272, Width=320, Height=54.
- Connect the
overlayViewIBOutlet property with it.
Once you do so, send the new UIView object to back, using the menu Editor > Arrange > Send to back. After that, send the image view to the back using the same method. This will make sure that the view will be above the image view but underneath the brand title label.
This view object is now ready, so we can move on to the re-positioning of the brand title and all stat labels. Below are listed the new frames for all labels, which are noted using their respective IBOutlet property name.
- titleLabel: X=20, Y=279, Width=280, Height=36
- likesCountLabel: X=20, Y=340, Width=91, Height=43
- viewsCountLabel: X=115, Y=340, Width=91, Height=43
- purchasesCountLabel: X=214, Y=340, Width=91, Height=43
- likesLabel: X=20, Y=383, Width=91, Height=21
- viewsLabel: X=115, Y=383, Width=91, Height=21
- purchasesLabel: X=214, Y=383, Width=91, Height=21
After having applied the above values to all labels, there is one just thing that needs to be done. Select all labels except for the brand title label, and center the text alignment though the Attributes Inspector, so they are all vertically aligned. Your scene now should look like this:
Step 2
Let's do some coding now, starting from the brand title label. Our work will take place in the CollectionDetailController.m file, inside the viewDidLoad method.
For starters, add the next two lines which change the brand title label's text size and color.
- ( void )viewDidLoad { ... ... _titleLabel.font = [UIFont boldSystemFontOfSize:22.0f]; _titleLabel.textColor = [UIColor whiteColor]; }
Next, instantiate a font and a color object to be used on all stat value labels. After doing that, set the font and color values to those labels:
- ( void )viewDidLoad { ... ... UIFont* countFont = [UIFont boldSystemFontOfSize:25.0f]; UIColor* countColor = [UIColor colorWithWhite:0.6f alpha:1.0f]; _likesCountLabel.font = countFont; _likesCountLabel.textColor = countColor; _viewsCountLabel.font = countFont; _viewsCountLabel.textColor = countColor; _purchasesCountLabel.font = countFont; _purchasesCountLabel.textColor = countColor; }
So far, so good! We need now to do the exact same thing for the stat title labels:
- ( void )viewDidLoad { ... ... UIFont* labelFont = [UIFont boldSystemFontOfSize:14.0f]; UIColor* labelColor = [UIColor colorWithWhite:0.6f alpha:1.0f]; _likesLabel.font = labelFont; _likesLabel.textColor = labelColor; _viewsLabel.font = labelFont; _viewsLabel.textColor = labelColor; _purchasesLabel.font = labelFont; _purchasesLabel.textColor = labelColor; }
One more thing before our job is finished. We have to make the brand title's background view transparent (the overlayView object), by modifying its background alpha value:
- ( void )viewDidLoad { ... ... _overlayView.backgroundColor = [UIColor colorWithWhite:0.0f alpha:0.4f]; }
We are ready. Run the application to see what a great visual impact have been caused by all changes we've done.
Step 3
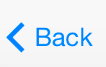
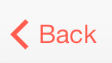
While being in the collection detail view controller, you may notice one more visual element that can be touched and match the general design we are trying to apply on the application. This is the Back button on the navigation bar. Currently, its color is set to the default blue one specified by the operating system. However, if we would change it to red, then it surely would seem much cooler. So, let's do it!
A navigation bar's item color can easily be changed, using a single line of code. Open the AppDelegate.m file, and go to the application:didFinishLaunchingWithOptions: method. Add the next one:
- ( BOOL )application: (UIApplication * )application didFinishLaunchingWithOptions: ( NSDictionary * )launchOptions { [ [UINavigationBar appearance] setTintColor: [UIColor colorWithRed: 1.0 green: 91.0 / 255.0 blue: 84.0 / 255.0 alpha: 1.0 ] ]; }
Through the tint color property we can change the color of the bar button items. Note that this property in iOS versions prior to 7 would change the background color of the bar, and not the buttons' text color. Also, the [UINavigationBar appearance] works globally for all navigation bars that may be added to an application as parts of navigation controllers.
Here is the back button now:
The Map View Controller
Our mission to set a new great design to the sample application keeps going perfect, and simply by running it and watching the results it becomes obvious that great improvements have been made up to here. But we don't stop here, as there are a couple of view controllers that need to be fixed as well. So, let's continue and this time let's visit the Map View Controller, the content behind the third tab of the tab bar.
Sincerely speaking, there is nothing particular in this view controller that needs to be changed, as a full-screen map covers the entire view. However, while being in this view controller the tab bar's deficiency is highlighted. Let's discuss it for a while. The problem with it is that its neutral, white appearance makes no impression at all. More over, the tab titles are quite close to the icons, and in the last tab especially, the title overlaps the icon, and this is a mistake that not even amateur designers should make. What can make these tabs really unique, is just a couple of simple things. First of all, we can make the tab bar catching the eye by setting another tint color on it and leaving the white color back to history. The title-icons problems can be overcome, if we simply omit the titles and allow only icons to exist on the tabs. By doing so, our tabs will acquire more space, and they'll look far better than now. As a last touch, we can make the selected tab to greatly distinguish from the others, simply by using a different background. All those modifications, even small, will greatly improve the app's appearance. The next two figures demonstrate the tab bar looking, before and after the changes we will apply later.


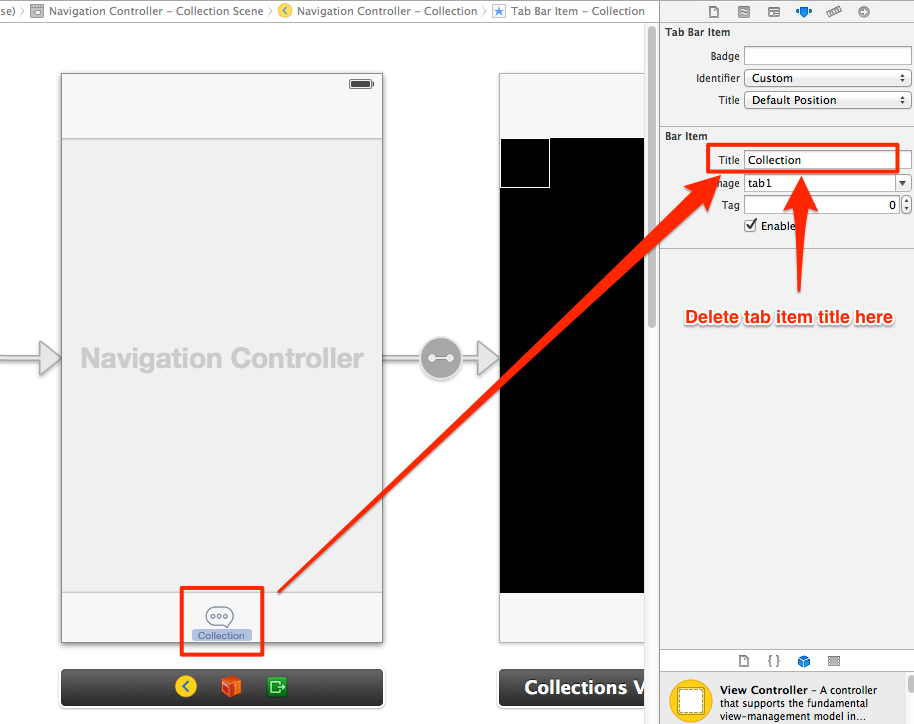
Start off by removing the tab titles. To do that, open the Main.storyboard file. Here is what we should do next for each one navigation controller:
- Click on the tab item.
- On the Attributes Inspector inside the Utilities Pane, locate the Title field under the Bar Item section, and delete its contents, as shown to the next image.
The first step is ready. Let's go now to change the tint color of the tab bar, to set a selection background image and do some more setup in code. Open the AppDelegate.m file and go to the application:didFinishLaunchingWithOptions: method. Add the next line to set a new tint color:
- ( BOOL )application: (UIApplication * )application didFinishLaunchingWithOptions: ( NSDictionary * )launchOptions { ... ... [ [UITabBar appearance] setBarTintColor: [UIColor colorWithRed: 1.0 green: 91.0 / 255.0 blue: 84.0 / 255.0 alpha: 1.0 ] ]; return YES; }
Next, we will set the tab bar icons in code, even though they have been already added through the Interface Builder, because we need to specifically set their position and the way they will appear. Inside the same delegate method, add the next code fragment and we'll talk about it later:
- ( BOOL )application: (UIApplication * )application didFinishLaunchingWithOptions: ( NSDictionary * )launchOptions { ... ... UITabBarController *tabBarController = (UITabBarController * )self.window.rootViewController; NSInteger index = 1; for (UIViewController* controller in tabBarController.viewControllers) { // Set the image of the tab bar items. NSString * tabImageName = [ NSString stringWithFormat: @ "tab%d", index++ ]; [controller.tabBarItem setImage: [ [UIImage imageNamed:tabImageName] imageWithRenderingMode:UIImageRenderingModeAlwaysOriginal] ]; // Apply the following insets so all tab images look vertically centered. UIEdgeInsets insets = UIEdgeInsetsMake( 5.0, 0.0, - 5.0, 0.0 ); [controller.tabBarItem setImageInsets:insets]; } return YES; }
Notice that we use the imageWithRenderingMode: method of the UIImage class, after we get the image itself using the imageNamed method. The imageWithRenderingMode: is new in iOS 7, and its aim is to create a new UIImage object based on the provided rendering option. We provide the UIImageRenderingModeAlwaysOriginal as a parameter, because we simply want to tell iOS that we desire to render the specific image as it originally is.
By modifying the insets of each icon, we simply push all icons from the top towards the bottom (metaphorically speaking) and set the icons to the appropriate position. If you'd like, just comment out the last command of the loop and test the app. You'll find out that the icons are not well-positioned in this case.
All the above do perfectly our job, but the different background image for the selected tab is yet missing. Let's add this too, and the tab bar is ready. So, add the next line to the method:
- ( BOOL )application: (UIApplication * )application didFinishLaunchingWithOptions: ( NSDictionary * )launchOptions { ... ... [ [tabBarController tabBar] setSelectionIndicatorImage: [ [UIImage imageNamed: @ "tab_sel" ] imageWithRenderingMode:UIImageRenderingModeAlwaysOriginal] ]; return YES; }
The selectionIndicatorImage property defines the background image that will be used for the selected tab, and that's why is being used here. The tab bar has now been fixed, so feel free to go and test the app. Here is an image with the outcome of our effort:
The Contact View Controller
The last task that's left to be done, is to do any required design changes on the Contact View Controller. In this one, a map view along with contact info are presented to the user, but the way everything is currently displayed is both unattractive and not that easy to read.
Consider now of the following couple modifications, that when they'll be done this view will seem much cooler and professional. First of all, the map is currently occupying just a portion of the view controller, but if its width would change so it lays out from edge to edge, it surely would look a lot better. Further than that, the contact info the way it's presented now, it's hard to be read and even more, a clipping occurs to the e-mail address as it's too big to fit on the view. It would be easier for users to focus on this info, if the font size could become a little smaller, and the text color would change to a gray one. So, let's go and do all these.
Starting from the map view, let's change its size using the Interface Builder. Open the Main.storyboard file and go to the Contact View Controller scene. Select the map view and set the following frame values through the Size Inspector: X=0, Y=0, Width=320, Height=229.

Let's add some new style to the information text now. Click to open the ContactViewController.m file, and go to the viewDidLoad method. In here, we'll add code for changing the font size and color of all labels. Add the next fragment and you're done:
- ( void )viewDidLoad { ... ... _contactLabel.font = [UIFont boldSystemFontOfSize:18.0f]; _contactLabel.textColor = [UIColor colorWithWhite:0.6f alpha:1.0f]; _addressLabel.font = [UIFont systemFontOfSize:16.0f]; _addressLabel.textColor = [UIColor colorWithWhite:0.6f alpha:1.0f]; _telephoneLabel.font = [UIFont systemFontOfSize:16.0f]; _telephoneLabel.textColor = [UIColor colorWithWhite:0.6f alpha:1.0f]; _emailLabel.font = [UIFont systemFontOfSize:16.0f]; _emailLabel.textColor = [UIColor colorWithWhite:0.6f alpha:1.0f]; }
Here is the outcome:
Designing an App in iOS 7
The features that iOS 7 incorporates are numerous. However, the most apparent one, immediately noticeable once you look at iOS 7, is the all-brand new user interface (UI). Redesigned from the ground-up, a clean, flat and uncluttered look and feel now dominates and nothing has been left to remind us of previous iOS versions. Translucency is characteristic for many UI controls (such as bars), while all buttons have become borderless. One could say that Apple's primary target regarding the UI was to make it as minimal and simple as possible, trying the same time to provide users with plenty of open and white space. Indeed, the whole design generally, and the flatten look in particular, lead users to focus to content without too many distractions from the interface elements. That fact becomes more apparent, if we consider that skeuomorphism belongs to the past as well (see for example the redesigned Game Center app).
iOS 7 brings new air, and all of its controls have been totally redesigned too. Not even one control has been left the same, or almost the same, with previous versions of iOS. And if you haven't seen them yet, now it's a good time to do it. Get the latest Xcode (version 5), which has also been refreshed so as to fit to the new ecosystem, and take a look to all new iOS 7 visual elements.
However, even though visual changes are too many, it isn't hard to work with the new operating system. Controls keep working as they did, gestures are the same as previously and generally, it's pretty easy for everyone to work with the new system as everything behaves as it used to behave. Imagine how hard it would be for developers, if behavior of controls would change too. Apart from a face lift, a radical core modification would be required for every application. Therefore, programmers appreciate that beyond the look and feel, the way the iOS interacts with the user is still the same.
iOS 7 gives developers a great opportunity to update their applications and adopt all those new features that introduces, but most importantly to adopt the new user interface. For those who have developed applications using the built-in controls, that would be a relatively easy job. However, more effort is required from all those who have built custom controls and graphical elements. There is also another important difference in iOS 7, which is not directly visible. In this version of iOS, Apple considers that users are now familiar enough with the iOS, and that's also a reason that some controls may not point out their purpose as clear as they did in previous versions of the operating system. For example, in previous iOS versions a button was clearly indicating its purpose, with border, shadow, etc. while in iOS 7, a button is just a borderless area with a string value or an icon inside it.
Everyone who begins developing applications for iOS 7 should walk through the Apple's Human Interface Guidelines (HIG) before writing even a line of code. I will highlight in here what one should always have in mind when designing new or updating existing apps.
First of all, great attention should be given to the content and not in the interface itself. Actually, the UI should only support the content, not compete with it and of course, it should never distract users from content. Everything in iOS 7 work for content's benefit, even view controllers, which now occupy the entire screen instead of the available space that was left between navigation and tab bars. Also, translucency should be used from views and controls to denote any extra content existing underneath them, and even more, to provide hints on how this content can be accessed. All this is what Apple calls deference.
Besides all that, not only content should be easily noticeable and understandable, but commands and controls that cause interaction should be distinguishable too. An approach to that is to use different color schemes for controls and the content, as well as to pick fonts that highlight the content. This logic is what Apple says clarity.
When there are too many views on-screen that users have to deal with, then it's necessary to be organized in a way that makes it easy to access the appropriate content according to their needs. A nice method to do that is to use visual hierarchy and appropriate positioning on all views that appear on screen, and that way give the feeling of the depth. This also can be achieved if views get separated in layers so everything is easy to be distinguished by the user.
Auto-layout, which was first introduced in iOS 5 and it was an optional feature for programmers, has now become almost a mandatory rule. Apple not just recommends, but actually dictates to use the auto-layout feature, so the iOS can arrange all views and subviews the way it wants. I don't think that there are many developers out there who still don't use this feature. In case you are one of them, then it's surely time to start using it. The great with auto-layout is that programmers don't have to worry about the view positioning when the device changes orientation, or how to lay views in multiple screen sizes. iOS is the boss and decides about everything.
Taking the auto-layout a step further, it's well known that, until iOS 6, when developers had the auto-layout enabled, they also had to mess with constraints that should have been properly set, so everything was correctly arranged on-screen. Even more, if views were manually created in code, then it was a little bit hard to set constraints manually. Generally, constraints many times were proved to be a really nuisance. Now, with iOS 7 (and the new Xcode version), this limitation has gone. By default, no constraints are set in views in Interface Builder, but developers can set them optionally. There is now much more freedom on both the kind of the constraints, and the way they can be applied, a fact that gives more power to programmers.
Generally speaking now, when talking about iOS designing, views, controls, etc, the discussion cannot stop here. However, through this theoretical approach, they have been presented all those necessary, basic guidelines that one should have in mind when building apps for the new version of the operating system. So, keep all these and let's go to make this tutorial even more interesting, by seeing some action in a sample application.
Summary
You can download the initial and final projects here. Through this tutorial an effort was made to demonstrate how a totally un-styled app, with no design applied at all, can be transformed to a really cool, professional-looking and attractive one, simply by using a short and easy code. Indeed, neither extremely hard work took place, nor too many code lines were written. Having in mind the new interface guidelines, one can style an application quite fast and with little effort.
- design
- iOS 7
Share this
how to design ios app ui
Source: https://www.appdesignvault.com/how-to-design-an-ios-7-app/
Posted by: wardhoulds.blogspot.com
10 comments
Hi Tope,
thanks for this, I've been trying to add style to my apps. it's something I'm quite bad at!
i have a problem with the final project : when I select an item from the collection, it displays OK in portrait mode, but when I rotate to landscape, all the text (title, likes,views etc) is missing, and it wont scroll. you mention the autolayout should handle this for us – is it something I have done, should it work OK?
Thanks,
Rob.
Unlike many guides online, this one was written well and used graphics to illustrate your points. Excellent work. I am a beginner in iOS development, and the main thing in not pulling the trigger yet on purchasing one of your themes is the uncertainty as to how well I would be able to use those template assets in an actual project. This guide will go a long way to help me figure it all out. Thanks for your hard work.
I have a collection view outlet to a subclass of UIViewController as you did in CollectionsViewController. But I have an issue that my collection view's contents are cover by the navigation bar and tab bar. To solve that I have to set the collection view's contentInsets manually so it's contents are not cover by the bars. I couldn't find any code in CollectionsViewController to set the collection view's contentInsets and your collection looks good.
So what did I miss here?
Thanks.
Pingback: Tutorial – How To Design An iOS 7 App | iPhone and iOS App UI Design Templates - appgong
You're awesome. More tuts like this will be great. This is powerful for even editing some of your templates you have. Keep up the great work!!!
Have you considered writing a design book/PDF. That would be something I would be interested in purchasing. Not many on Amazon.