

How To Animate A Logo In Premiere
Building a brand takes work; if you desire viewers to recognize your logo, it's of import to include it in practically all of your marketing materials.
It's easy to add a logo in Adobe Premiere Pro, whether you're featuring it in the intro to your video or as a watermark. In this tutorial, we'll comprehend 3 key logo techniques:
- How to create a logo intro from a template
- How to add a logo overlay
- How to use a logo as a watermark
1. How to Add a Logo Intro in Adobe Premiere Pro from a Template
Offset, let'due south review how to create a logo-centric reveal. For this section, We are going to employ a template from Envato Elements called Flat Logo Opener. Pre-built templates make it easy to but driblet in your logo.
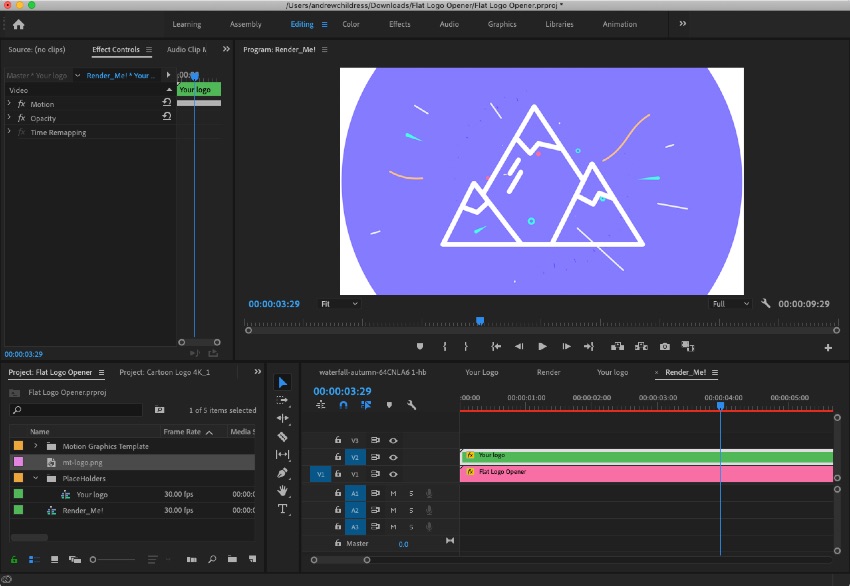
Once you download the template, double click to open it in Adobe Premiere. So, detect the layer labeledYour Logo.Double click on information technology to open up this composition up.
Once you're in theYour Logocomposition, you demand to add together a logo to the timeline. Browse to your logo file, then drag-and-drop it onto the timeline. In this template, we demand to grab the right handle and pull it to about the 10-second marking and then that the logo covers the template.
One tip: you might need to click on the logo and scale: click and drag the corner to resize it down.
That's information technology! Spring back to theRender_Me!layer and play the preview to meet an updated animation that includes your logo.
You could besides keep to customize this by opening the layer labeledFlat Logo Opener.At this signal, it requires a bit more knowhow to customize the colors and shapes, so it's best to choose a template that matches your style if you're a beginner.
For an intro that focuses on a logo, using a template is the best method. It helps yous avoid creating animations from scratch that merely have too long. Consider one of the templates from Envato Elements to bring a logo to life, quickly.
2. How to Add a Logo Overlay
A logo overlay stays on acme of your video and persists. This is perfect if yous just want to add your branding.
Make sure to add your logo to a layer above your video prune. And so, pull the logo'southward handle to the right on the timeline to cover the duration of the video.
After you place your logo, yous might notice that it'due south too large or out of position versus what you had in heed. Find the tab labeledEffect Controlswell-nigh the upper left corner (when working in theEditingworkspace.)
On theEffect Controlspanel, start by scaling the logo to your ideal size. Utilize the calibration slider, then pull it to the left to reduce the size or the right to increase it.
Then, utilise thePositionsliders to reposition it. Click and drag the two numeric values for pixel positions on the canvas.
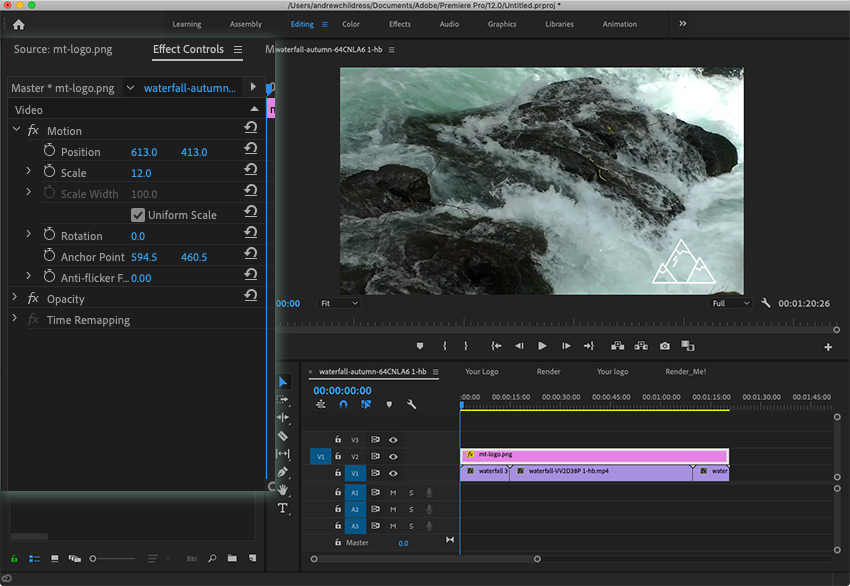
That's it! At the end, you've placed a logo overlay like the one you see in the screenshot above.
3. How to Employ Your Logo as a Watermark
One twist on a logo overlay is awatermark.This is a more than present, merely faded logo overlay style. Utilise a watermark when you want to protect your make's intellectual holding or for draft copies.
With your logo layer selected, find theOpacitydropdown on theUpshot Controlsoption. Then, pull the opacity down to fade it. Watermarks should be visible simply not overly obstructive.

Typically, watermark overlays cover nigh or all of the canvas. I adapted theScaleandPositionoptions to enlarge the logo.

Source: https://azoora.com/blog/tutorial/tutorial-adding-a-logo-to-video-in-adobe-premiere-pro/
Posted by: wardhoulds.blogspot.com
0 Response to "How To Animate A Logo In Premiere"
Post a Comment